
ANEW RELEASE | ESTIMATED READ TIME – 7:06
Create email campaigns right from your dashboard with Race Roster’s email campaign tool. You can communicate with participants, donors, volunteers, registrants who abandoned your registration form, and more, all from the same place you manage your event!
The email campaign tool is incredibly powerful, allowing you to send one-time or automated emails to communicate the right message to the right audience at the right time. Today, we’re diving into the many capabilities of the email campaign tool, so you can set up email campaigns on Race Roster like a pro!
Getting started with the email campaign tool
Templates
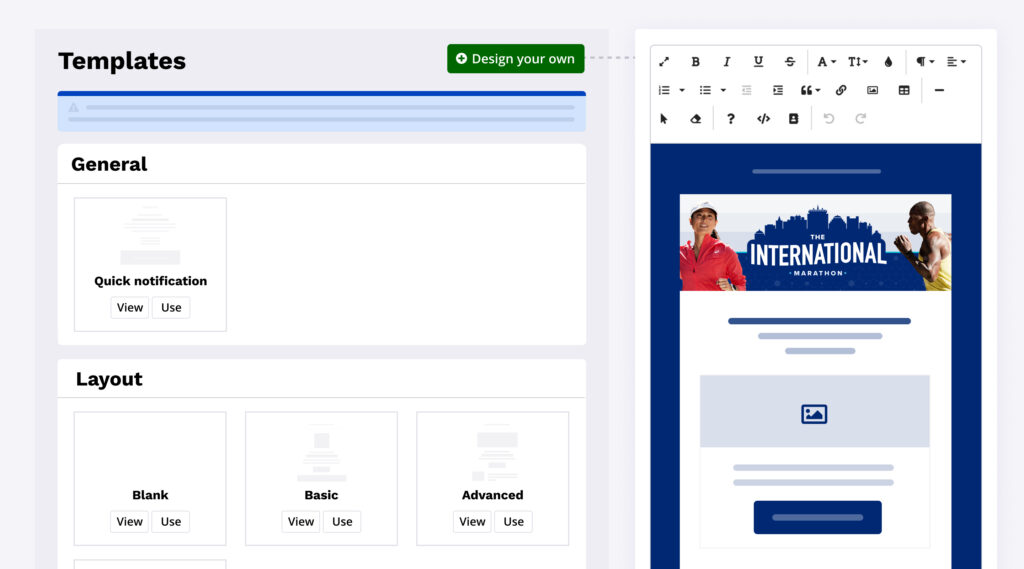
We recommend setting up a template before you create your first campaign. This template will act as a base for all your emails going forward, allowing you to create consistent emails for a branded and professional look.
You can start by selecting one of our pre-made templates, or design your own completely from scratch. Once you’re happy with your template, you can save and select it later when setting up your first campaign.
The next thing you’ll want to set up is a sender profile so you don’t have anything blocking the send of your first campaign. A sender is from whom your email campaigns will be sent. This could be an individual person or the name of your company. To create one, simply visit the sender tab and click the “create new sender” button.
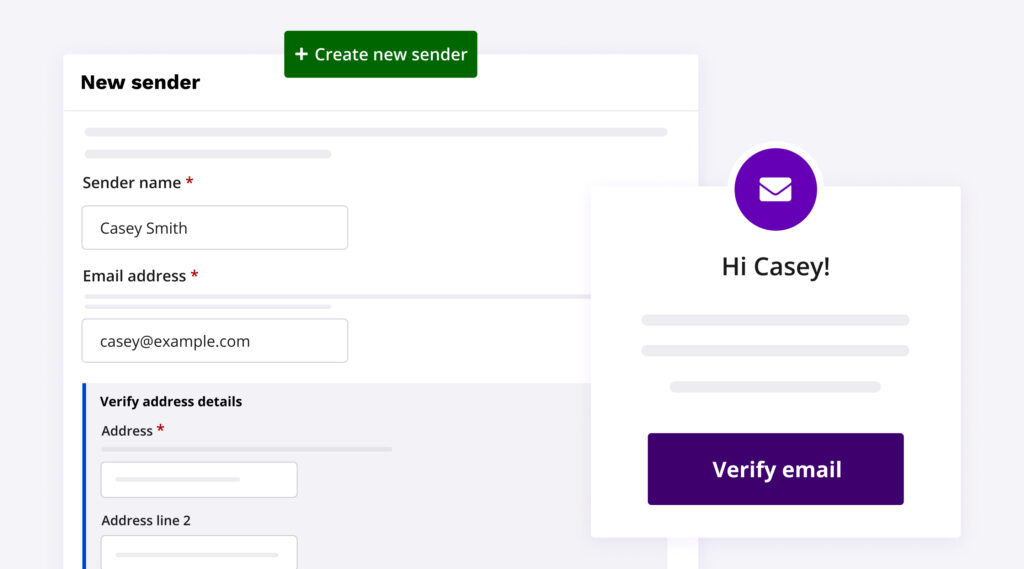
You will be prompted to enter in the name, email, and address of the sender. An email containing a verification link will be sent to the email you’ve entered to verify the sender profile.
Another thing to keep in mind while setting up your sender profile is your “reply to” address. Is your “sender” address a different email than the one you would like the recipients of your email to reply to? If so, you should also set up a sender profile for the email that will be used for the reply-to address.
Creating an email campaign
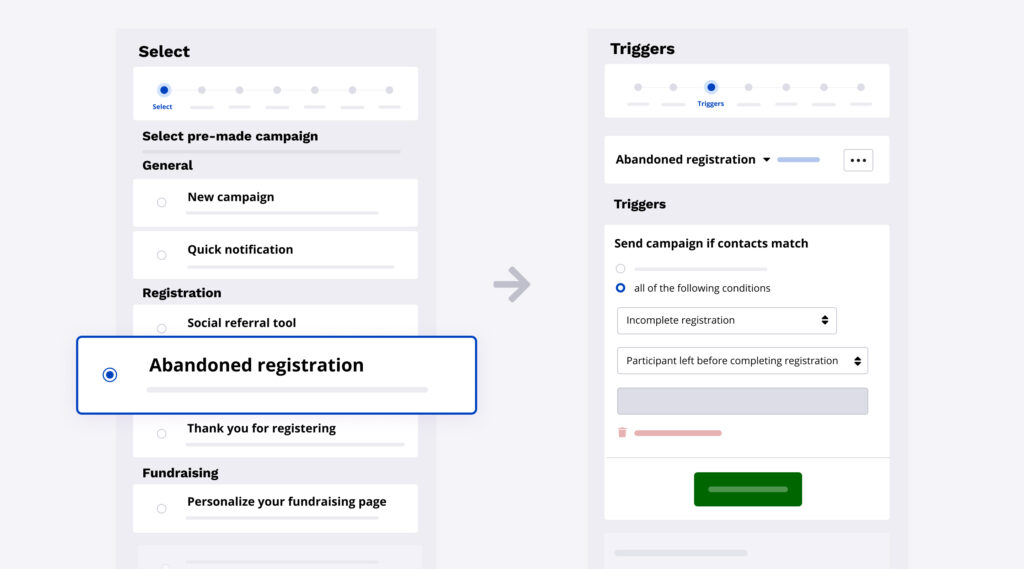
Now you are ready to create your email campaign! Depending on your goal, you can either create a completely custom campaign or select one of the available pre-made options:
- Social referral tool
- Abandoned registration
- Thank you for registering
- Personalize your fundraising page
A pre-made campaign will automatically set up your campaign triggers for you, where a custom campaign gives you free rein to select your own triggers. Later on in this article, we’ll cover what exactly email triggers are!
Email settings
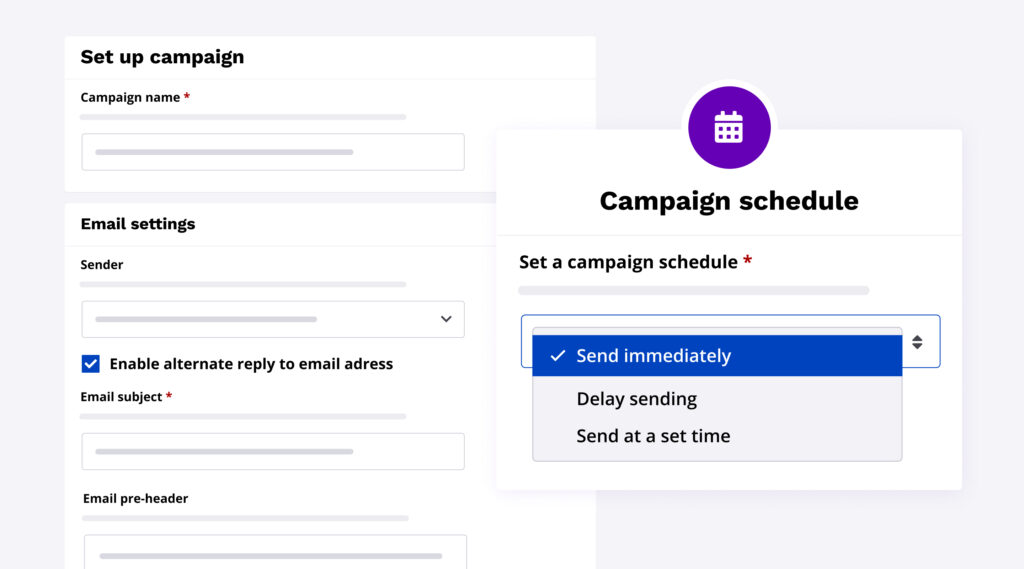
Next, you can enter your campaign’s name, subject line, pre-header, and select the sender profile you just set up! If your sender email address is not the email you want the recipients of your email replying to, you can enable an alternative “reply to” address.
This is where you can select the “reply to” sender profile you set up in advance.
Campaign schedule
There are three options presented under campaign schedule:
- Send immediately – Send as soon as recipients meet the campaign’s sending conditions.
- Delay sending – Send campaign after a specific amount of months, days, hours, and/or minutes after they have met the email’s sending conditions.
- Send at a set time – Select a specific date and time for your email to send.
Triggers
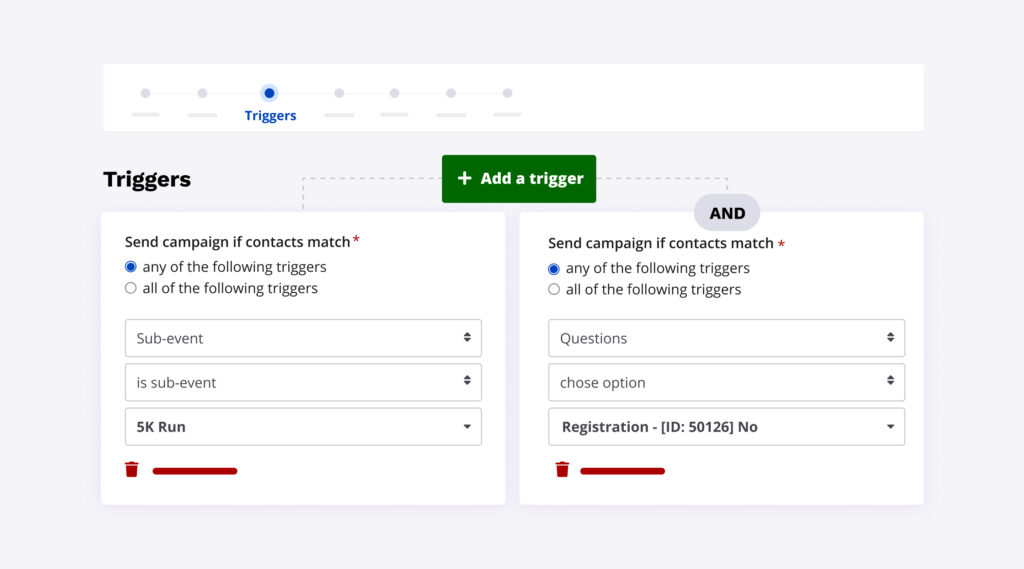
What is an email trigger?
An email trigger is the criteria that needs to be met by a recipient in order to receive the email. For example, you may only want to send this particular email to participants that registered for your 5K sub-event. Perhaps you also only want it to be 5K participants that answered “no” to your question of “have you participated in this event before?”. Triggers allow you to ensure your campaign only reaches this specified audience.
Triggers can be incredibly powerful and there are many to choose from! We’ll be going more in-depth into what triggers are available and the many use cases for them in an upcoming article – so stay tuned!
Selecting a template for your campaign
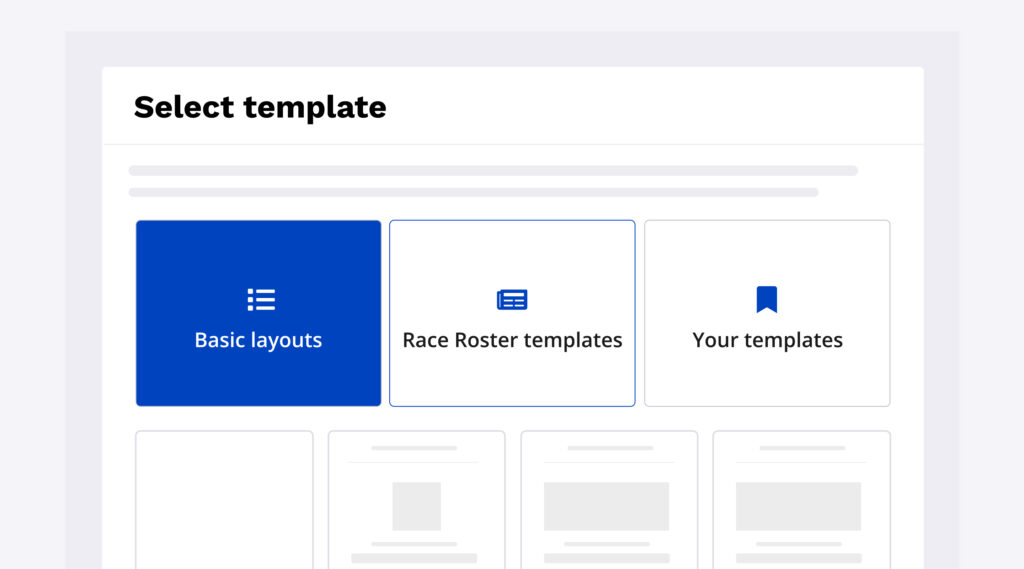
Now you are at the stage where you can select the template you set up in advance or select one from the many available options. To use a template you have already created, simply select “your templates”.
If you will be using or creating a custom template, feel free to skip to the next section of this article!
To create a campaign completely from scratch, you will need to choose one of the following options under the basic layout tab:
- Blank
- Basic
- Advanced
- Advanced 2
If you’d like to use a pre-made template, select “Race Roster templates” and you will find a library of templates for the following:
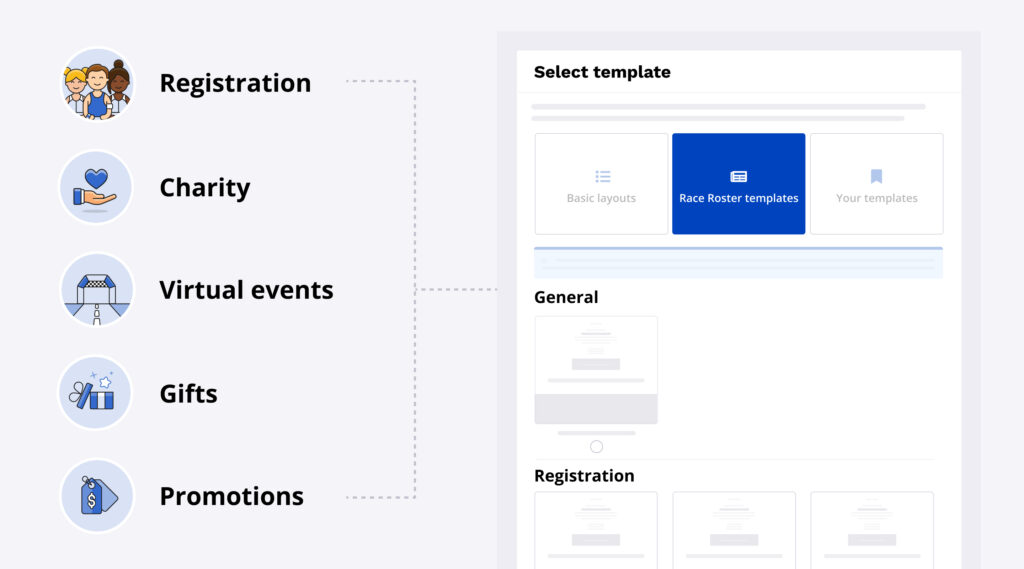
Registration
- Social referral tool – this can be sent out to notify participants if you will be providing promoters with a monetary reward for successful referrals! The template pulls in their unique promoter URL and encourages them to spread the word about your event.
- Abandoned registration – Win back potential participants that didn’t finish filling out your registration form.
- Thank you for registering – Easily enable an automated email that will send to thank participants for registering for your event.
Virtual run
We offer a variety of email templates for virtual events:
- Virtual run (with any run tracking app)
- Virtual run (the ASICS Runkeeper™ app)
- Virtual bib – This template contains a printable bib template that will automatically pull in the participant’s name.
- Virtual Challenge (How to post an activity)
- Virtual Challenge (the ASICS Runkeeper™ app)
Charity
- Personalize your fundraising page – Contains a quick link to each participant’s ready-to-customize fundraising page.
Gifts
- Holiday gifting promotion – A great way to encourage purchasing a registration to your event as any holiday gift!
- Valentine’s day gifting promotion – A great way to encourage purchasing a registration to your event as a Valentine’s Day gift.
Promotions
- The ASICS Runkeeper app benefits – Want to encourage your participants to use the ASICS Runkeeper app? This campaign template has everything you need and a link to offer participants 90 days FREE of Runkeeper Go™.
Customize
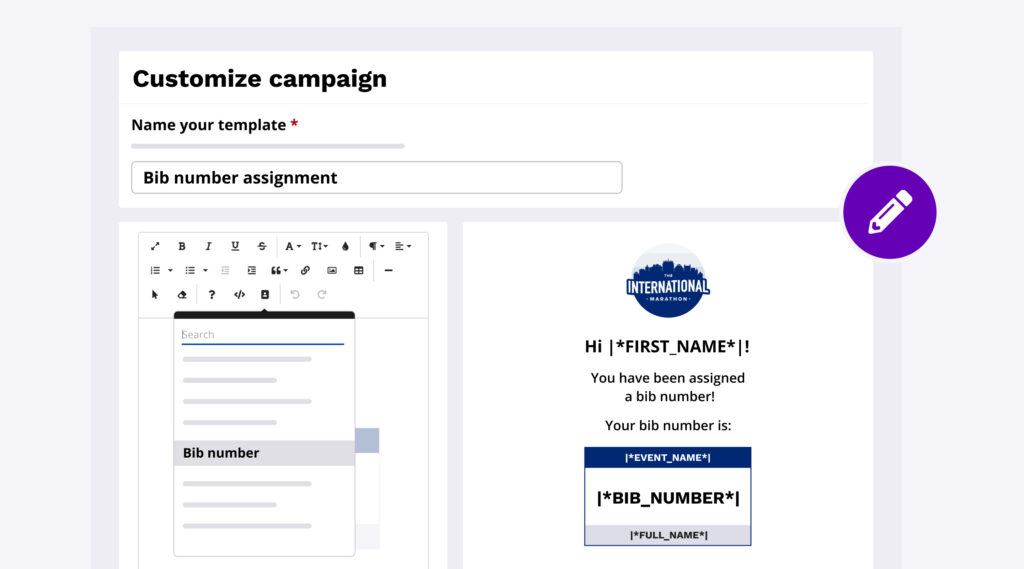
This step is your opportunity to customize your email’s layout, images, links, and add in dynamic merge tags to personalize content.
With Race Roster merge tags, you can go so much farther than just pulling in a “first name”. This is an easy way to pull in:
- Specific links – URL for each participant’s personal fundraising page, confirmation URL, transaction receipt URL, team URLs, links to your event page, results page, etc.
- Images – Confirmation QR code image, Confirmation barcode image, etc.
- Participant information – Bib number, promo code used, products purchased, full name, age, etc.
- Event contact information – Contact name, phone number, etc.
- Event information – Event name, event distance, etc.
- Fundraising information – Earnings, goal, achievements earned, etc.
And more! If you are looking for something specific, use the merge tag search functionality.
Recipients
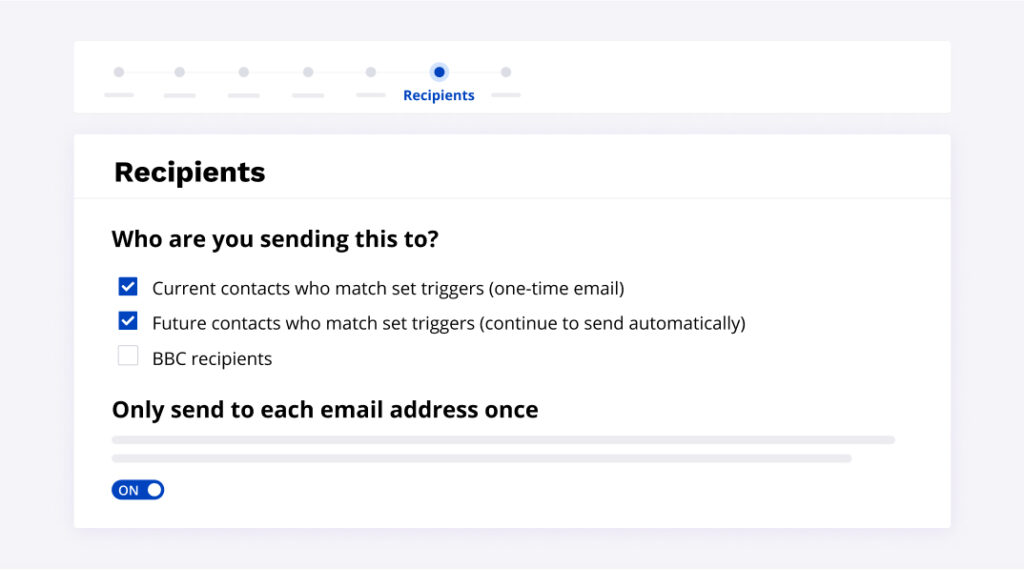
This step is where you will want to decide if your email campaign will be sent out to everyone who meets the criteria of your campaign at the time of sending, and/or if you would like the campaign to continue sending as more recipients meet the conditions of the send.
For example, you may have a campaign that you want to send to everyone who is currently registered for your event, but you also want to make sure that people who haven’t registered yet get the email once they are registered. In this case, you would select both “Current contacts who match set triggers (one-time email)” and “Future contacts who match set triggers (continue to send automatically)”.
Next, you will need to determine if you would like to enable the “Only send to each email address once” option. This feature will only send 1 email to each unique email address. This feature is best used for marketing communication where each email address should only receive one copy of the email and should not be enabled when sending event information such as bib numbers, where you would want each participant to receive their unique email, despite an email address being shared between 2 or more participants.
Review
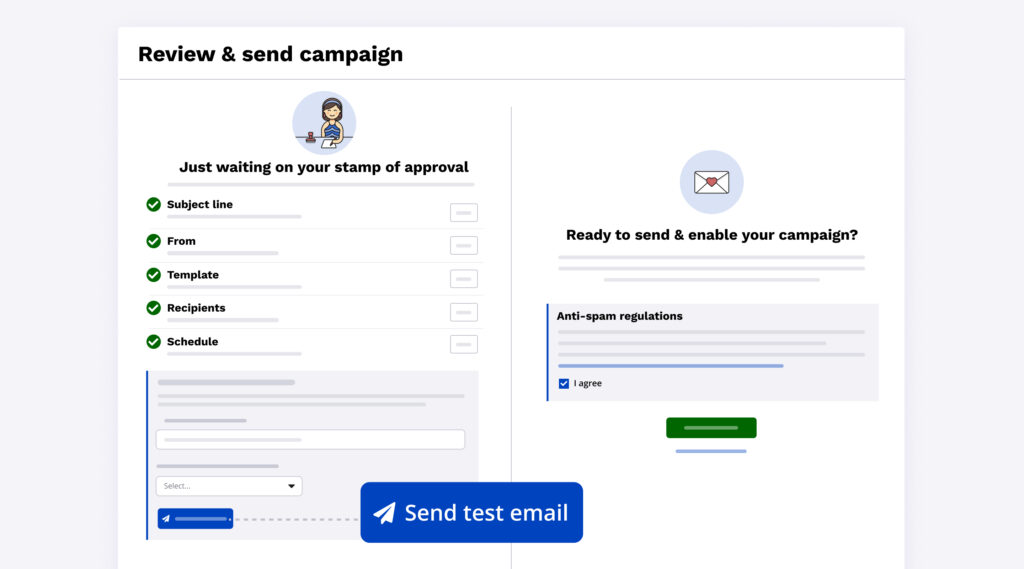
Finally, you’ve reached the review stage! Now you can send a test to yourself and anyone else you’d like to get eyes on your campaign before you send. You can always go back to any of the previous screens to adjust your content and settings.
Track
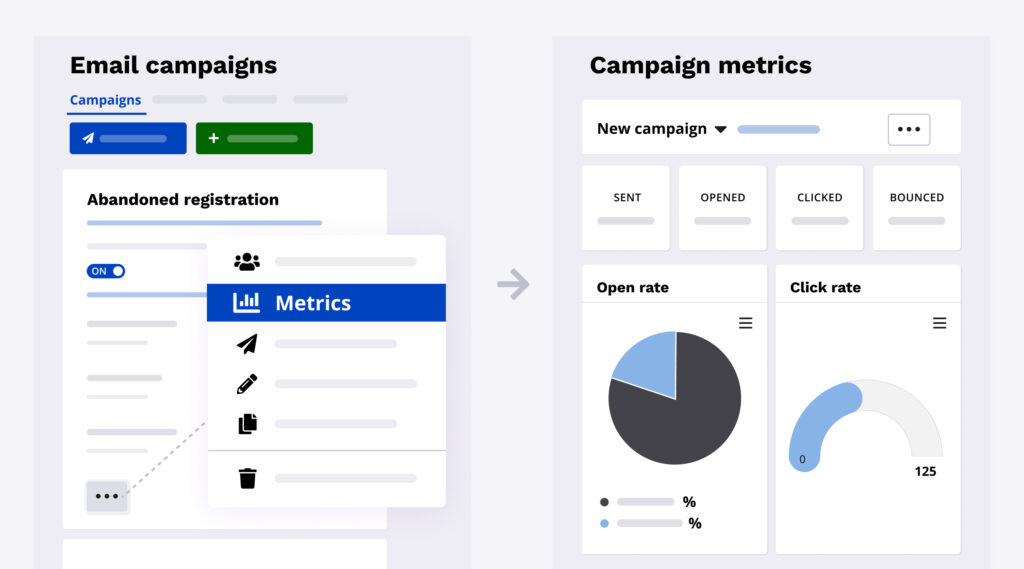
Once everything is good to go, you can send your campaign and celebrate! To keep tabs on total sends, opens, clicks and other metrics, you can visit the email’s metrics page at any time. To do this, visit the campaigns tab, click the ellipsis on your campaign’s card, and select “metrics”.
If you have any questions at all, please reach out to our Customer Success team at [email protected]. We’d be happy to assist you with your email campaign!
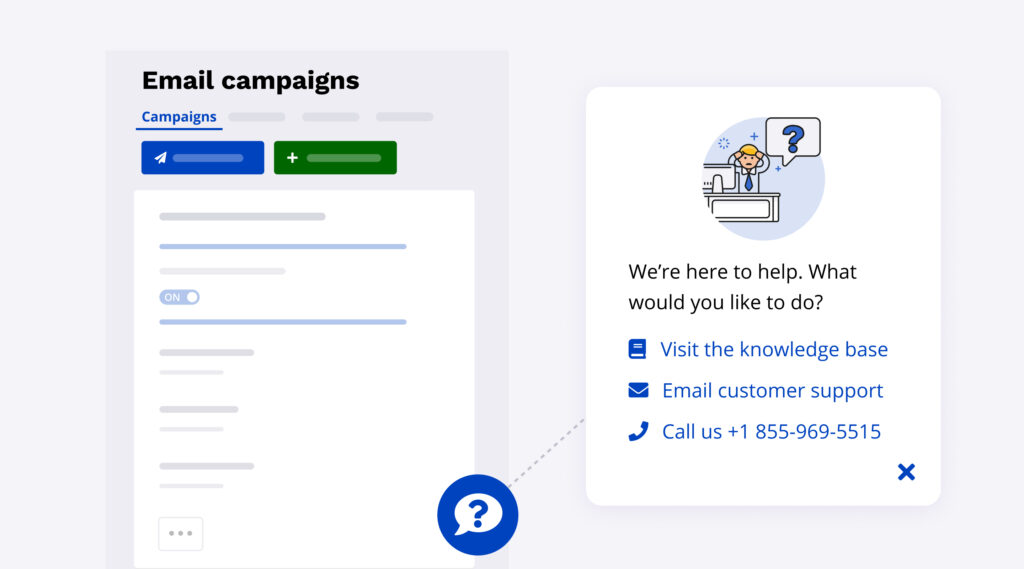
You can also click the floating question mark icon that appears at the bottom right of the screen when creating an email campaign for quick access to contact us!